Showing posts with label TP-LINK. Show all posts

Friday, June 21, 2013

How to apply the Network Sharing USB Settings Function on TP-LINK routers

Suitable for: TD-VG3631, TD-W8968, TD-W8970, TD-W8980, TL-WDR3500, TL-WDR3600, TL-WDR4300, TL-WDR4900, TL-WR1043ND, TL-WR2543ND, TL-WR842ND

Step 1
Plug an external USB hard disk drive or USB flash drive into this Router. Then login to the router.
 
Step 2
On the left menu, go to USB Settings-> Storage Sharing. Make sure the Service Status is Started and the shared storageis Enabled, if not, please click on Start or Enable. If you cannot see the USB device, please double check the USB device is well plugged, then click on Rescan.


If you want to physically unplug the USB disk from the router, please click on Eject Disk. 


Step 3
 
Set the User Accounts.
There is a default item (you cannot delete the item or change the User Name).
Besides, you can click Add New User to add three more items (you can delete the items or change all the selections).
 
    
Step 4
 
Enjoy Storage Sharing.
You may click on Open the Disk in the router’s page. (This feature only supported on Internet Explorer 8/7/6.)


Note: If theService Status is stopped or the shared storage is disabled, Open the disk is not clickable.


Or you can press Windows logo + R then type \\192.168.1.1\ or \\192.168.1.1\Volume ID (for example, \\192.168.1.1\Volume1) in the Run dialog box and press Enter. A window will pop up requiring the username and password, please type in the corresponding username and password configured in Step 3.


After that, please click OK and you will see the network sharing files of USB device.
 
For how to access to the USB drive via router's Network Sharing function on Mac, please click here.

How to Configure IPSec Tunnel (VPN) on TP-LINK TD-W8960N/TD-W8950ND

This article illustrates a configuration instance for building an IPSec VPN tunnel between two units of TD-W8960N/TD-W8950ND.

If you have only one unit and you want to setup a client to site VPN connection. This FAQ is not available for you and the TD-W8950ND/TD-W8960N has no such function to meet your need. They can´t work as a VPN server.
IPSec tunnel is usually built to connect two or more remote LANs via Internet so that hosts in different remote LANs are able to communicate with each other as if they are all in the same LAN. For more details about VPN tunnel please refer to Wikipedia.

Figure 1 Configuration Instance

Here are step by step instructions for your reference (the following steps are based on Figure 1): 

Configuration on Site A

1.    Login to the management page of TD-W8960N/TD-W8950ND. If you are not sure how to enter the management page, please click here for details.

2.    On the left menu of the management page, please click Advanced Setup and then click IPSec.


3.    On the IPSec main page, please click Add New Connection.


4.    On the IPSec configuration page, please do configuration as follows:


IPSec Connection Name: Define a name for this connection;

Remote IPSec Gateway Address: Input he WAN IP address of site B;
Site A

Tunnel access from local IP addresses: For a whole LAN please select Subnet; for a single host please select Single Address. In this instance we select Subnet;

IP Address for VPN: Input the LAN IP range of site A. In this instance, we should input 192.168.1.0;

IP Subnetmask: Input the LAN subnet mask of site A. In this instance, we should input 255.255.255.0;

Site B

Tunnel access from remote IP addresses: For a whole LAN please select Subnet; for a single host please select Single Address. In this instance we select Subnet;

IP Address for VPN: Input the LAN IP range of site B. In this instance, we should input 192.168.2.0;

IP Subnetmask: Input the LAN subnet mask of site B. In this instance, we should input 255.255.255.0;

5.    Leave other settings as the default value and click Save/Apply.

Configuration on Site B

1.    Log onto the management page of TD-W8960N/TD-W8950ND.

2.    On the left menu of the management page, please click Advanced Setup and then click IPSec.

3.    On the IPSec main page, please click Add New Connection.

4.    On the IPSec configuration page, please do configuration as follows:


IPSec Connection Name: Define a name for this connection;
Remote IPSec Gateway Address: Input he WAN IP address of site B;

Site A

Tunnel access from local IP addresses: For a whole LAN please select Subnet; for a single host please select Single Address. In this instance we select Subnet;

IP Address for VPN: Input the LAN IP range of site B. In this instance, we should input 192.168.2.0;

IP Subnetmask: Input the LAN subnet mask of site B. In this instance, we should input 255.255.255.0;

Site B

Tunnel access from remote IP addresses: For a whole LAN please select Subnet; for a single host please select Single Address. In this instance we select Subnet;

IP Address for VPN:
Input the LAN IP range of site A. In this instance, we should input 192.168.1.0;

IP Subnetmask:
Input the LAN subnet mask of site A. In this instance, we should input 255.255.255.0;

5. Leave other settings as the default value and click Save/Apply.

Check the IPSec Connection

1. On the host in LAN1, press [Windows Logo] + [R] to open Run dialog. Input “cmd” and hit OK.


2. In the CLI window, type in “ping 192.168.2.x” (“192.168.2.x” can be IP address of any host in LAN2). Then press [Enter].


If Ping proceeds successfully (gets replies from host in LAN2), the IPSec connection must be working properly now.

Here until, all basic configuration required for an IPSec tunnel is completed. If one of the site has been off line for a while, for example, if Site A has been disconnected, on Site B you need to click Disable and then click Enable after Site A back on line in order to re-establish the IPSec tunnel.

If there are any further problems, please click here to contact TP-LINK technical support.

How To configure TL-WA5110G/TL-WA5210G to wireless AP Client Router mode

Step 1
Connect your computer to TL-WA5110G/TL-WA5210G with a LAN cable and log into the Web-based Utility by entering the IP address192.168.1.254 into Web Browser.
 
 
Step 2
Configure the operation mode to AP Client Router and connect to the wireless network.
  
1. Click on Operation mode on the left, select AP Client Router, then click on Save.


2. Click on Wireless -> Wireless Mode on the left side, select Client.(In that page, only Client mode is available)


3. Click on Survey/Search button to view the available wireless networks.


Connect to the root WIFI Network.


After click on Connect button, the SSID and the MAC address of the root router/AP will be shown in the Client mode box automatically.
Or if you know the SSID or the MAC address of the root router/AP, you can type them in the SSID or MAC of AP box manually, and then Click on Save to save the settings
 
3. Click on Save.
 
Step 3
 
Click Network->WAN. Then select the correct type for WAN Connection Type. If you are not sure about the WAN Connection type, please contact your service provider about this.
 
For Dynamic IP: You just need to select Dynamic IP from the drop-down menu and then click on Save.
 
For Static IP: Please select Static IP from the drop-down menu, and input the correct parameters in the boxes. The parameters are given by your internet service provider (ISP). Then click on Save
 

For PPPOE: Please select PPPOE from the drop-down menu, and input the correct parameters (Username and Password) in the boxes. The parameters are given by your service provider. Then click Save.
 
 
Step 4
Click Security settings. Select the same security settings as the network you want to connect. Click Save and reboot the device.
WEP.
 
  
Or WPA-PSK/WPA2-PSK


Step 5
After the configuration, please refer to the link in Step 1 again to change the IP address of your computer back to Obtain IP address automatically.

NOTE: Just in case, if the IP address of the root router/AP is 192.168.1.254 as well, you will need to change the IP address of TP-LINK device to avoid IP conflict. You can do it as follows:


1.     Click Network->LAN on the left side.
2.     Change the IP Address to 192.168.2.254.
 
 
 3.     Click on save, and reboot your device.

Friday, May 31, 2013

How to configure TL-WA5110G/TL-WA5210G as a repeater

Suitable for: TL-WA5110G, TL-WA5210G


Attention:TL-WA5110G /TL-WA5210G can only support WEP security type under Repeater/Universal Repeater mode.
Information of Root Router:
  • LAN IP: 192.168.1.1
  • SSID: TP-LINK-test
  • Encryption Type: WEP Open Hexadecimal
  • Passphrase: 0123456789
      
    Preparation
    Since the DHCP function on TL-WA5110G /TL-WA5210G is disabled by default, we have to manually assign an IP address as 192.168.1.x to the computer to match the default IP address (192.168.1.254) of the AP. Please click here for detailed instruction.
    For example, we can configure the computer’s Local Area Connection IP address as 192.168.1.100/255.255.255.0
    Then please connect the computer to the AP with an Ethernet cable.
    Configuration on Device (TL-WA5110G / TL-WA5210G):
    1.   Login to the Repeater’s management page.
    In the address bar of the web browser, type in the IP address of the repeater (default is 192.168.1.254) and press Enter.
    Type in the Username and Password (default is admin).


  2.  Click Operation Mode, select AP mode and click Save.


 3.   Click Wireless -> Wireless Mode. Select Universal Repeater as the Wireless Mode. Then click Survey.
(If the Root Router supports WDS, you can select Repeater as Wireless Mode.)


4.   Find the Root Router’s SSID on the AP List, and then click Connect.


5.   Click Save. 

If you can see the following picture, please wait until it refreshes back to the Status page.


6.    Do the same Wireless Security Settings as your Root Router.
At Repeater/Universal Repeater mode, TL-WA5110G /TL-WA5210G can only support WEP as security type. And if your Root Router´s wireless network is secured, please make sure that the security type is WEP.
 
In our example, the Root Router is WEP secured.      
Click Wireless ->Security settings
Select WEP, and set the same Type, Key Format and Key Type as the Root Router.
Then put in the same password "0123456789".
Click Save.
 
 
7. Click System Tools->Reboot->Reboot to restart the device.
 
 
After you go through all the above steps, the Repeater should be working properly with the Root Router.
NOTE:
After you finish the settings, please change the Local Area Connection IP address setting for your computer back to the default.


Thursday, May 30, 2013

TP-Link TL WA5210G Configuration Client Mode

The Image below shows how an AP client works.


Here we take the following information as an example. However, you need configure it properly according to the basic information of your own router.

Information of Root Router:
  • LAN IP: 192.168.0.254
  • SSID: TP-LINK-test
  • Encryption Type: wpa2-psk
  • Password: 0123456789

Preparation:
Since the DHCP function on the AP is disabled by default, we have to manually assign an IP address for the computer to match the IP address (192.168.1.254 in default) of the Client. Please click here for detailed instructions.
Here, you can configure the IP address as 192.168.1.100/255.255.255.0.


Connect the computer to the LAN port of AP with an Ethernet cable.
Configuration on Client (TL-WA5110G OR TL-WA5210G):

Step 1
Log onto the Client’s management page.
In the address bar, type in http://192.168.1.254, then press enter.


 Then type in the username and password, which are both “admin” in default.


Step 2
Click Network on the left side menu. Please make sure the AP’s IP address is in the same IP segment with the Root Router’s to avoid the IP conflict. In this instance, we can change the IP to “192.168.0.1”. Then click Save.
 
And then change the IP address of your computer back to 192.168.0.100/255.255.255.0, logon the web page with 192.168.0.1 again.

Step 3
On the left side menu, click on Operation Mode, selectAP/Standard APmode, and clickSave.
 

Step 4
Click Wireless ->Wireless mode. Select Client as the wireless Mode. Then click Survey.

Step 5
Find the Root Router’s SSID on the AP list, and click Connect.

Step 6
Click Save.
If you see this picture, please wait until it refresh back to the status page.

Step 7
Click Wireless ->Security settings. You must make sure the Security type of your root AP. Here we take wpa2-psk as a example. Select WAP-PSK/WPA2-PSK, and type in the password “0123456789”. Then click Save.

After you go through all the above steps, the Client should work properly with the Root Router.

Please re-configure the IP settings of your computer to Obtain an IP address automatically/Obtain a DNS server address automatically in order to connect to Internet after all the settings, click here for detailed instructions. Then you can check the connectivity by using Ping in command prompt on that computer. For how to use Ping, please refer to how to use Ping command.

NOTE:
If you have a broadband router which provide you Internet connection, please re-configure the IP settings of your computer to Obtain an IP address automatically/Obtain a DNS server address automatically to suitable for the router in order to connect to Internet after done the settings.

If the Ping is not successful, please check all above settings carefully, or contact TP-LINK support for help.


Wednesday, May 29, 2013

TP-Link TL WA5210G Configuration


TP-Link TL WA5210G configurations as access point
Connect all the cables to it and to your computer,Open your browser and type its default ip(192.168.1.254) to access it web console.A pop up page will ask you to enter user name and password.
Tip:Default username and password is “Admin”


Once you will see its web console main page,


Click on Quick setup in the left navigation bar.Click on Next to proceed to the setup,Select AP  in the operation mode page and click Next.You can select AP-Client router if you want it to connect to you WISP.But we are going to configure it to use as a Wifi Access Point so we will choose AP(Access Point).

In the next step,you will see the Wireless Settings, 
Enter your Network Name in the SSID Field,This name will be shown in the air.

Select your Current country in the Region Filed.
Choose a channel that is not used or less used by other devices in your area.(Remember:Choosing the same channel for more than one devices in the same range may disturb your wireless distribution).

Click Next.


After reboot device will be Configured and now you can detect its wireless signals on wireless devices.Now we will Change some of its  settings to make it work flawlessly.
Click on the Network Tab in the left Navigation bar.Now we will change its default IP So that hackers may not try to get into our device or they may not flood our device.

Change the last prefix of your IP Address and click save.(e.g 192.168.1.254 change to 192.168.1.200).
                           Tip:After reboot, access your device’s web console with new changed IP i.e 192.168.1.200

Now we will change the distance settings,click on Wireless menu in the left navigation bar and select the sub-menu named Distance Settings.
Set the Adjust option to outdoor,and put distance to 4 kilometers.(Trust me,it will not through signals to 4 kilometers we are just setting it to get max. coverage)
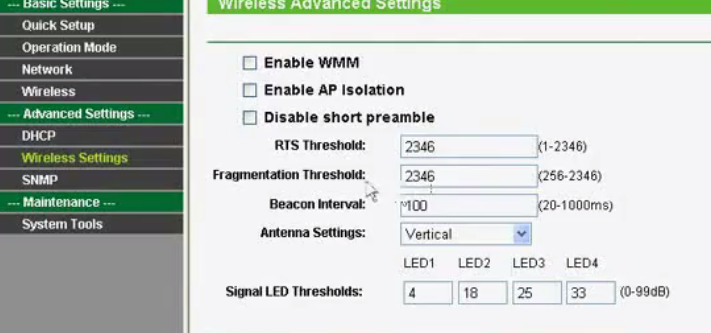
Now Click on Wireless settings and make sure your are using the Vertical Antenna in Antenna Settings.
                                            Tip:If you are using an external antenna with it,you must set Antenna Settings to External.

Now Click On System Tools and click on password to change your current password.
Now we will take the backup of our settings so that in case of  loosing our config. we should not waste our time on re config.
Click on Backup in system tools and click on Backup.You will get a backup file,save it to your computer.